Use Uptodate To Install Yum Linux
Method 2: Enable EPEL repository on RHEL7, CentOS7 and SL7. We prefer method 2, which enables the EPEL repository. So install the EPEL Repository on both nodes. Import the Public Key on both nodes. Before installing, find the available latest version of DRBD to install using yum.
Yellowdog Updater Modifier (yum) is an RPM based package manager which is used to install and update packages in various Linux distributions including CentOS, RHEL and Fedora.
Yum is quite powerful as it’s capable of automatically resolving dependency issues, and is similar to other package managers such as ‘apt-get’ in Debian based distributions.
These examples should serve as a useful introduction, guide or cheat sheet style resource for how to use the yum command in Linux.
How To Use yum – Command Examples
1. Install New Package From Repository
The yum command can be used to install packages from a repository with the ‘install’ argument, followed by the package name. In the example below, we are installing Apache, which is provided in the ‘httpd’ package.
Note that after confirming the packages that will be installed, you will be asked to provide input. In this case we entered ‘y’ for yes to proceed with the installation, which then completed successfully.
2. Assume Yes
In the first example we were prompted to press the ‘y’ key in order to proceed with the installation. Rather than being prompted each time for user input, we can simply specify the ‘-y’ option in our command for assume yes. This way we will not be prompted for any input and yum will assume that everything will be answered with yes.
Note that in this example we were not prompted for input, as assume yes has been provided, so the package was installed fully without any further user interaction.
3. Check For Available Updates
We can run yum with the ‘check-update’ argument which will check in with our enabled repositories for any updates that may be available for packages that we have installed. This does not actually perform any updates, it simply gives us a list of packages that have updates available for installation.
4. Update New Package From Repository
In the previous example we have been provided with a list of packages that currently have package updates available. We can perform an update to a specific package by specifying it after the ‘update’ argument, as shown below.
Note that we do not have to run check-update prior to this.
While we can update specified packages in this manner, it is often easier to simply apply all available updates for all packages on the system with ‘yum update’.
5. Download Package RPM File
Rather than installing a package from the repository as demonstrated previously, we can optionally download the .rpm file from the repository with the ‘yumdownloader’ command.
The ‘yumdownloader’ command comes from the ‘yum-utils’ package, so we install this first.
Now we can download the RPM file to the local system.
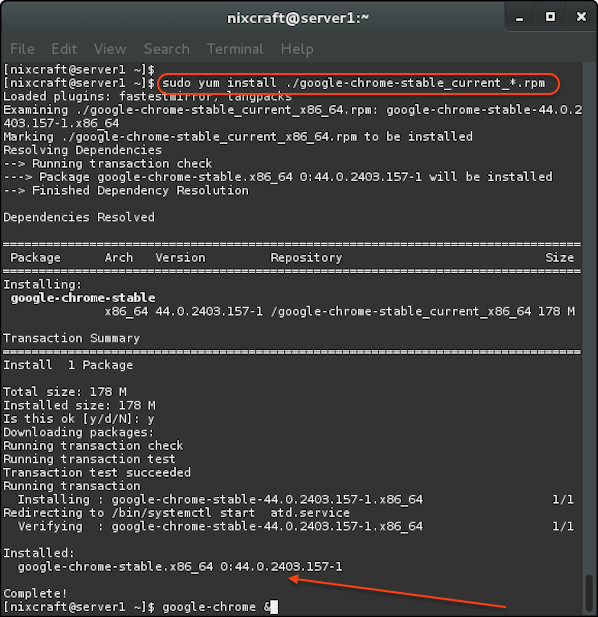
6. Perform Local Install Of RPM File
In this example we will install the .rpm file that we just downloaded with ‘yumdownloader’. While we could have just installed this package from the repository directly with ‘yum install’, sometimes you may be provided with .rpm files directly for installation so it’s worth knowing how to install them.
Cancionero jesus adrian romero el aire de tu casa pdf. While .rpm files can be installed with the ‘rpm’ command, using yum has the advantage of automatically detecting and installing any other package dependencies that may also be required.
7. Uninstall Package
Packages can be uninstalled with the ‘remove’ argument, as shown below.
Tropico 1 Free Download Full PC Game. Tropico 1 Free Download Full Version RG Mechanics Repack PC Game In Direct Download Links. This Game Is Cracked And Highly Compressed Game. Specifications Of Tropico 1 PC Game. Genre: Simulation, Strategy, City Builder Platform: PC Language: English Size: 777 MB Publication Type: Repack By RG Mechanics. Download Setup File. Download Tropico Reloaded pc games latest full version setup.exe file with serial number direct link for windows higly compressed. Tropico 1 is more than of a economic simulator city builder. About This Game. Tropico 1 Reloaded is a construction and management simulation mix strategy video game by Kalypso Media Digital. Tropico 1 download ita. Download + Tropico 2 - Easy Setup (1.90 GB) Tropico screenshots: Tropico takes the tried-and-true formula of careful micro-management and gives it an entertaining twist by placing you squarely in the role of the newly installed dictator of a small Caribbean country. The designer's approach is a light-hearted, but still appropriately deep. Tropico is a full version game only available for Windows, being part of the category PC games with subcategory Strategy. With Tropico, you'll definitely have to make use of creative strategies to boost your chances of winning. Since we added this game to our catalog in 2016, it has managed to obtain 22 downloads, and last week it had 4 downloads.
Note that in order to remove a package, all other packages which depend on it will also be removed. For that reason it is recommended not to use the -y option to ‘assumeyes’ when removing a package so that you get a chance to read what will be removed before proceeding, as it may be more than you expect.
In the above example, the httpd-manual package that we installed previously requires the httpd package. Therefore when we remove the httpd package, httpd-manual must go too.
8. Reinstall Package
If you’re having a problem with a package, you can easily reinstall it with the ‘reinstall’ argument.
This is similar to performing a ‘yum remove’ followed by a ‘yum install’, however here it’s done in the one command and custom configuration is not removed, as a ‘yum remove’ will delete all configuration files managed by the package.
9. View Repository Information
By default we have many repositories configured in the /etc/yum.repos.d/ directory, these can be viewed with the ‘repolist’ and ‘repoinfo’ arguments.
By default ‘repolist’ displays information for enabled repositories only, however we can specify ‘all’ afterwards to list even disabled repositories.
Further information on a specific repository can then be viewed with ‘repoinfo’ followed by the repo name that you want to query.
10. Add New Repository
We can specify a new repository by manually editing or creating a new .repo file in the /etc/yum.repos.d directory, however we can much more easily create a persistent repository with the yum-config-manager command. This command comes from the ‘yum-utils’ package which we installed previously, so if you wish to use ‘yum-config-manager’ be sure to first install ‘yum-utils’.
We simply provide a known repository URL in the –add-repo option, and this creates a .repo file based on the name of the repository URL specified. In this case, /etc/yum.repos.d/mirror.aarnet.edu.au_pub_centos_7.repo has been created with the contents specified above in the output of the command. We can now install or update packages from this newly specified mirror.
11. Enable Or Disable Specific Repository
There may be times when we want to perform an action while enabling or disabling a specific repository. For example if we want to install a particular package, we may want to ensure that it comes from a specific mirror.
This would enabled a previously disabled repo named ‘disabled-repo’ in order to install ‘package-example’ from it.
If we have the same packages available at multiple repositories we may wish to disable one and update or install from a specific repository. This can be done by disabling the repository with --disablerepo.
12. Search For Packages In Repository
The ‘search’ argument is a very useful yum feature, as it allows us to search through packages on the repository which can be useful if we don’t know exactly what we’re looking to install.
In this example we search package names and the summary for the term “PHP” and see a number of available packages at the repositories ready for us to install or download.
13. Find Which Package Provides Something
This is one of my favourite features of the yum command as it’s very useful. Have you ever wanted to run a command, but you’re not sure which package is required for it? This is where the ‘provides’ argument comes in use.
In this example we want to create an iSCSI initiator, this is done with the ‘iscsiadm’ command. We can use ‘provides’ followed by the name of the command to search for packages that provide this command.
As shown the ‘iscsi-initiator-utils’ package can be installed to provide the ‘iscsiadm’ command.
This can also be used against a file on the file system to check which package provides that file.
In this example we can see that the /etc/httpd/conf/httpd.conf file comes from the ‘httpd’ package.
14. View Package Information
Further detailed information of a package can be viewed with the ‘info’ argument. As shown below, this provides us with useful information such as the architecture, version number, release number, total size, as well as a description of what the package actually does.
This can be used before a package is installed or after installation, the same information will be provided in both situations.
15. View Transaction History
The yum history contains all actions that have been performed by the yum command. This allows us to see what has happened to our Linux system over time, and even undo, redo, or roll back a transaction.
The newest transactions appear at the top of the list, and we can view further information of a transaction by specifying its ID, as shown below.
So the most recent transaction with the ID of 15 was used to remove the httpd package. Now we can undo this transaction if we want, which should install the httpd package again, as this will undo the removal.
We can then run the removal again with ‘yum history redo’.
It’s also worth noting that package installations, updates, or removals are also logged in the /var/log/yum.log file, here’s an example of what’s logged here.
16. Clear Cached Information
By default yum will cache data to the /var/cache/yum directory, such as package and repository data. This speeds up yum so that it doesn’t have to keep querying this information from the Internet.
There are times when you may want to delete this cached data, such as if a repository has updated packages but your Linux system has incorrect or stale cached data which may cause various problems when attempting to install a package.
This will remove all cached items, it is possible to otherwise specify specific elements to clear (such as packages, metadata, expire-cache, rpmdb or plugins) however this saves a lot of time if you aren’t sure what should be removed.
17. Build Cache
The yum cache will be automatically built up over time when you perform various yum queries such as installing or updating packages, however we have the option to manually make the cache so that future actions will be quicker with the ‘makecache’ argument.
We can also add the ‘fast’ option to the end, which will take less time but only cache fewer repositories.
As we can see the fast cache was significantly faster.
18. List Installed Packages
We have the ability to list all packages that are currently installed on our Linux system with ‘yum list installed’. I have not included the full output here as I have hundreds of packages installed on my system, however this small snippet should give you an idea of what to expect.
When piped into the grep command this becomes extremely powerful as it allows us to search for a specific package to see if it is installed.
19. List Available Packages
In the above example we learned how to list currently installed packages on our Linux system with the yum command, now we want to be able to query a repository and list its available packages instead.
This is quite similar, except that we replace ‘installed’ with ‘available’ to instead list all available packages.
As we can see we have over 300 packages currently installed, however in the repository there are almost 9000 packages in total for us to install.
We can also run ‘yum list all’ to list both installed and available packages together, or ‘yum list updates’ to only list packages which currently have updates available, the output of which is similar to the ‘yum check-update’ command covered previously.
20. Package Groups
Packages that are related to each other may be grouped together into a package group. This allows us to install, update, or remove the package group which is actually made up or many other individual packages.
For example we can run ‘yum grouplist’ to view the groups that are available for us to use by default.
Once we have the list of available groups, we can use ‘yum groupinfo’ on any of them to get an idea of the packages that are included as part of the group.
Here we can see the “Basic Web Server” group is actually made up of three other groups, base, core, and web-server. If we look closer at the web-server group we can see that it uses the httpd package as well as some additional ones that we do not yet have installed but are available, as denoted by the ‘+’ symbol.
Finally we can install the group with the ‘yum groupinstall’ command, as shown below.
The group can also be updated with ‘yum groupupdate’, or all packages within the group removed with ‘yum groupremove’.
21. Install Security Updates Only
While we can simply perform a ‘yum update’ to update all of our installed packages to the latest versions, this may not be ideal in a production environment. Being able to install security only updates during patching may be a requirement in your environment, and can be done with ‘yum update --security’.
22. Exclude Specific Package
We can optionally exclude a specific package from update, installation or removal with the -x command which will exclude that package. In this example, we perform a ‘yum check-update’ and confirm that a kernel update is available, however we do not wish to install this package at this time. With the help of -x, we ignore the kernel update and instead perform a ‘yum update’ which states that it is going to update everything except the kernel, which is not listed.
23. Add Random Wait Time
There are times where you may want to insert a random period of time before performing some yum command, for example if you manage hundreds of servers and go to update them all on a particular day you probably don’t want them all to hit the repository at the same time as this may cause the process to run very slow. With the -R option we can specify a maximum random time in minutes that yum will wait before executing the command, somewhere within this time period will be selected at random.
In this example I appended the ‘time’ command to the ‘yum’ command so that we could see how long it took to complete, in this example we can see that this took approximately 1 minute and 22 seconds to complete, which is a random period from 0 to 2 minutes as was specified.
24. Hide All Output
As you have seen in the above examples, the yum command can provide quite a bit of output. If we don’t want to display the output messages we can simply specify the -q option for quiet which will hide all of the output. In the example below we completely uninstall a package with yum and have no messages output.
25. Display Verbose Information
Alternatively if you’re troubleshooting you can specify the -v option to enable verbose output. In the below verbose example we can see additional information in the output that was not previously available.
Summary
This guide has covered how to use yum with 25 different examples in which you can practically put the yum command to use.